Navigation light upgrades aren't optional anymore. Regulations have tightened, enforcement has ramped up, and LED technology has become the standard. If you're still running old incandescent bulbs, you're burning through battery power, risking compliance issues, and missing out on visibility that could prevent a collision. The shift to LED isn't just about efficiency—it's about meeting the rules that keep everyone safer on the water.
We've walked through dozens of these installations, and the pattern is clear. Most boaters who upgrade do it right before an inspection or after getting flagged by the Coast Guard. That's reactive. The smarter play is getting ahead of it, understanding what the updated regulations actually require, and installing lights that won't leave you scrambling when it matters. This isn't complicated, but it does demand attention to detail. Miss a step, and you're either non-compliant or dealing with electrical problems down the line.
Regulations Have Caught Up to Technology
The rules around navigation lights have evolved because the technology has. LED lights offer better visibility, longer lifespan, and lower power draw—but they also need to meet specific standards. The U.S. Coast Guard and international bodies like the IMO have updated their requirements to reflect what modern lights can and should deliver. If you're installing new lights, you're not just swapping bulbs. You're ensuring your setup meets current COLREGS standards, ABYC A-16 guidelines, and any regional requirements that apply to your waters.
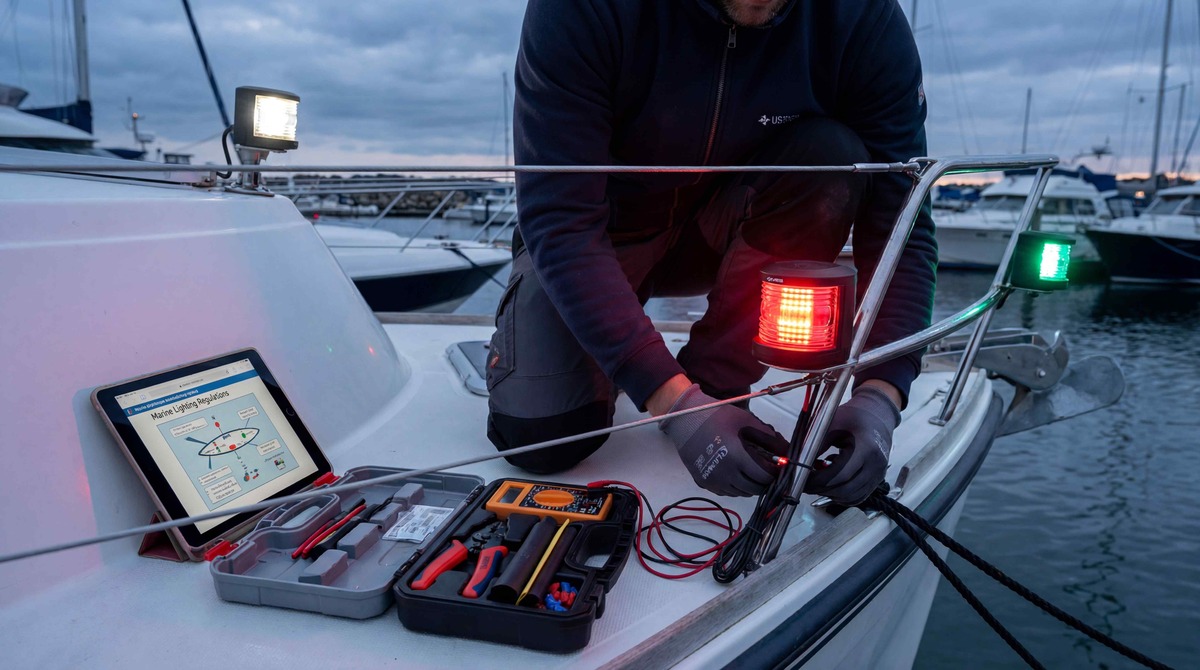
Here's what matters most. Your lights need to display the correct color, maintain the proper arc of visibility, and be mounted at the right height. Red for port, green for starboard, white for stern and masthead—that's non-negotiable. But beyond color, the intensity and range have have to match what's required for your vessel size and type. LED lights that aren't certified for marine use won't cut it. The certification isn't a suggestion. It's proof that the light has been tested and meets the standards that keep you legal and visible.
- Certified lights must meet ABYC A-16 or COLREGS standards
- Color and arc of visibility are strictly defined by vessel size and type
- Mounting height and placement affect compliance and visibility
- Non-certified lights can fail inspections and create safety risks
Power Draw Matters More Than You Think
One of the biggest advantages of LED navigation lights is how little power they pull. Traditional incandescent bulbs can drain your battery overnight, especially if you're anchored and running lights for extended periods. LEDs use a fraction of that power, which means your battery lasts longer, your charging system works less, and you're not stuck with a dead battery when you need to start the engine. This isn't just convenience—it's reliability.
<p
But the power efficiency only works if the installation is done right. Poor wiring, incorrect gauge wire, or loose connections can create resistance that negates the benefits. We've seen setups where the lights flicker, dim, or fail entirely because someone used automotive-grade wire instead of marine-grade. Saltwater and moisture are relentless. If your wiring isn't up to spec, corrosion will find it, and your lights will fail when you need them most.
- LEDs use up to 90% less power than incandescent bulbs
- Marine-grade wiring is essential to prevent corrosion and voltage drop
- Proper gauge wire ensures consistent power delivery
- Loose or corroded connections cause flickering and failure
Mounting Position Isn't Flexible
Where you mount your navigation lights isn't up for interpretation. The regulations specify exact placement based on your vessel's length and type. Port and starboard lights need to be visible from dead ahead to 112.5 degrees aft on their respective sides. The stern light must be visible from 135 degrees on either side of dead astern. The masthead light, if required, needs to be mounted high enough to be visible over the bow and from the sides. Get the placement wrong, and you're not just non-compliant—you're invisible to other vessels in critical situations.
We've seen boats where the lights are mounted too low, blocked by railings, or angled incorrectly. In every case, the fix required remounting, which means drilling new holes, sealing old ones, and redoing the wiring. That's avoidable. Before you drill anything, check the manufacturer's specs, measure the arcs of visibility, and confirm that nothing on your boat will obstruct the light. A few extra minutes of planning saves hours of rework and keeps you compliant from the start.
Polarity Isn't Negotiable with LEDs
LEDs are polarity-sensitive, which means they only work when wired correctly. Reverse the positive and negative, and the light won't turn on. This isn't like an incandescent bulb where polarity doesn't matter. With LEDs, you have to get it right the first time. Most marine LED lights are clearly marked with positive and negative terminals, but if you're working with older wiring or a boat that's been modified, you'll need to test the circuit with a multimeter before connecting anything.
We've pulled lights that were wired backward and left boaters confused about why their new LEDs didn't work. The fix is simple—swap the wires—but it's frustrating and wastes time. Worse, some people assume the light is defective and return it, only to have the same problem with the replacement. Test your polarity before you connect the light, and double-check your work before you seal everything up. It's a small step that prevents a lot of headaches.
Waterproofing Determines Longevity
Marine environments are brutal. Saltwater, spray, humidity, and UV exposure will destroy anything that isn't properly sealed. LED lights are more durable than incandescent bulbs, but they're not invincible. The housing, wiring connections, and mounting points all need to be waterproofed to prevent corrosion and failure. We've seen lights that lasted less than a season because the connections weren't sealed, and saltwater worked its way into the wiring.
Use marine-grade sealant on every mounting hole, every wire entry point, and every connection. Heat-shrink tubing with adhesive lining is your best option for wire connections—it seals out moisture and provides strain relief. Don't rely on electrical tape or standard heat shrink. They won't hold up. The goal is to create a barrier that keeps water out, even when the boat is pounded by waves or sitting in the rain. Proper sealing adds maybe ten minutes to the install, but it extends the life of your lights by years.
- Marine-grade sealant is required for all mounting holes and wire entry points
- Heat-shrink tubing with adhesive lining seals connections against moisture
- Electrical tape and standard heat shrink fail in marine environments
- Proper sealing prevents corrosion and extends light lifespan
Testing Before You Seal Everything Up
Once the lights are mounted and wired, test them before you finish the job. Reconnect the battery, turn on the navigation lights, and verify that each light works correctly. Check the brightness, make sure there's no flickering, and confirm that the colors are correct. Walk around the boat and verify the arcs of visibility from different angles. If something's wrong, it's easier to fix now than after everything is sealed and buttoned up.
Use a multimeter to check voltage at each light. You should see consistent voltage that matches your battery's output. If the voltage is low or fluctuating, you've got a wiring issue—either resistance from a poor connection, undersized wire, or a bad ground. Fix it before you move on. We've seen too many installs where someone skipped the testing phase, sealed everything up, and then had to tear it all apart when the lights failed on the water. Testing takes five minutes. Redoing the job takes hours.
Documentation Keeps You Covered
Keep the paperwork that comes with your LED navigation lights. The certification documents, installation instructions, and proof of purchase are all important if you're ever inspected or need to make a warranty claim. Some jurisdictions require proof that your lights meet specific standards, and having the documentation on hand makes that process quick and painless. Without it, you're stuck trying to track down information or proving compliance after the fact.
We keep copies of all our light certifications in the boat's documentation folder, along with wiring diagrams and installation notes. It's saved us time during inspections and made troubleshooting easier when we've had to diagnose issues. If you're selling the boat, having this documentation also adds value—it shows the next owner that the work was done right and that the lights are compliant. It's a small detail that pays off in multiple ways.
Maintenance Keeps Them Working
LED lights are low-maintenance, but they're not no-maintenance. Saltwater and UV exposure will degrade seals, corrode connections, and dull lenses over time. We inspect our navigation lights at the start of every season and after any rough weather. Check the lenses for cracks or discoloration, test the lights for brightness and function, and inspect the wiring connections for corrosion. If you catch problems early, they're easy to fix. Wait until a light fails, and you're dealing with a bigger issue.
Clean the lenses regularly with fresh water and a soft cloth. Salt buildup reduces visibility and can trap moisture against the housing. If you notice any corrosion on the connections, clean it off with a wire brush and apply dielectric grease to prevent it from coming back. These small steps keep your lights working at full brightness and extend their lifespan. The goal is to avoid surprises when you're on the water and need your lights to work.
- Inspect lights at the start of every season and after rough weather
- Clean lenses with fresh water to remove salt buildup
- Check wiring connections for corrosion and apply dielectric grease
- Replace any cracked or discolored lenses immediately
When to Call a Marine Electrician
Most navigation light installs are straightforward, but some situations call for professional help. If your boat has complex wiring, multiple light circuits, or older electrical systems, a marine electrician can ensure everything is done correctly and safely. They'll have the tools to test circuits, diagnose issues, and make sure your installation meets all the relevant standards. It's worth the cost if you're not confident in your electrical skills or if the job involves modifying existing wiring.
We've called in electricians for boats with outdated wiring or when we've needed to add new circuits for additional lights. They work faster, catch issues we might miss, and provide documentation that's useful for inspections and resale. If you're unsure about any part of the install—polarity, wire gauge, circuit protection—get a professional involved. The peace of mind is worth it, and you'll know the job is done right.
Compliance Isn't Optional
Navigation lights aren't just about avoiding fines. They're about being visible to other vessels and preventing collisions. The regulations exist because they work. Boats that meet the standards are easier to see, easier to identify, and less likely to be involved in accidents. Upgrading to LED lights that meet updated regulations is one of the simplest ways to improve safety and stay legal on the water.
We've seen the difference firsthand. Boats with properly installed LED navigation lights are visible from farther away, even in poor conditions. The colors are brighter, the arcs of visibility are correct, and the lights don't dim or flicker. That visibility matters when you're navigating at night, in fog, or in crowded waters. The investment in quality lights and a proper install pays off every time you're on the water. Compliance isn't a box to check—it's a standard that keeps everyone safer.
Stay Safe and Ready for the Water
When it comes to your boat, cutting corners on safety just isn’t an option. If you want your navigation lights installed right the first time—or need a hand troubleshooting electrical issues—let’s make sure you’re set for every trip. Give us a call at 305-290-2714 or Request Boat Repair or Service and we’ll help you get back on the water with confidence.

.png)