Rainwater collection on a boat isn't just a sustainability play—it's a practical move that extends your autonomy on the water. Every gallon you capture is one less you need to haul, pump, or ration. For non-potable applications like deck washing, gear rinsing, or head flushing, a well-designed rainwater system can shift your operational calculus entirely. The setup isn't complicated, but execution matters. A sloppy install leads to leaks, contamination, and wasted effort. A tight one? You'll wonder why you didn't do it years ago.
The beauty of rainwater collection is that your boat already has most of what you need. The hardtop, bimini, or even a section of deck can serve as your catchment area. The challenge is channeling that water efficiently, filtering out debris, and storing it without creating a maintenance nightmare. This isn't about reinventing the wheel—it's about building a system that works with your boat's layout and your actual usage patterns. Skip the theory. Focus on what moves the needle.
Figure Out What You Actually Need
Most boaters overestimate their rainwater needs or underestimate their storage constraints. Start by calculating your non-potable water consumption. How often do you wash the deck? How much water does your head use per flush? What about rinsing fishing gear or cleaning fenders? Add it up over a typical week on the water. That number tells you how much storage capacity you need and how aggressive your collection setup should be.
Next, survey your boat for viable installation points. Walk the deck with a critical eye. Where does water naturally pool during rain? Which surfaces are cleanest and most accessible? Where can you mount a storage tank without interfering with lines, hatches, or foot traffic? The best system is the one that integrates seamlessly into your existing layout. If you're constantly tripping over your collection tank or rerouting lines around your gutters, you've failed before you've started.
The Collection Surface Does Half the Work
Your catchment area is the foundation of the entire system. A dirty, porous, or poorly angled surface will sabotage everything downstream. Hardtops and biminis are ideal because they're already elevated and designed to shed water. Canvas can work, but it requires more frequent cleaning and may introduce contaminants. Deck sections are viable if you can create a slight slope toward your collection point without creating trip hazards or drainage issues.
Clean the surface thoroughly before your first collection. Salt residue, bird droppings, and oxidized gelcoat will all end up in your tank if you don't scrub them off first. Once the system is running, plan to rinse the catchment area regularly—especially after long dry spells when dust and debris accumulate. The cleaner your collection surface, the less work your filter has to do and the longer your storage tank stays usable.
Gutters and Channels Keep It Moving
Water won't collect itself. You need gutters or flexible channels to direct flow from your catchment area to your storage tank. Marine-grade PVC or flexible rubber channels work well because they resist UV degradation and can conform to curved surfaces. Mount them along the lowest edge of your collection area, ensuring a consistent downward slope toward your outlet point.
Seal every joint with marine-grade sealant. A single gap will bleed water and reduce your collection efficiency. Use stainless steel fasteners to secure the gutters—anything less will corrode in the marine environment. Test the slope by pouring water at the highest point and watching it flow. If it pools anywhere, adjust the angle. Gravity is your friend here, but only if you give it a clear path.
Filtration Isn't Optional
Rainwater looks clean, but it's carrying leaves, insects, dust, and whatever else was sitting on your deck. A pre-filter catches this debris before it reaches your storage tank. The simplest option is a mesh screen installed at the gutter outlet or downspout entry point. Stainless steel mesh works better than plastic because it resists clogging and lasts longer in saltwater environments.
For a more robust setup, consider a first-flush diverter. This device captures and discards the initial runoff from each rain event—the dirtiest water that washes accumulated grime off your catchment surface. After the first flush, cleaner water flows into your tank. It's an extra step, but it dramatically improves water quality and reduces tank maintenance. If you're serious about keeping your system clean, this is where you invest.
- Mesh screens catch large debris but require frequent cleaning
- First-flush diverters improve water quality by discarding initial runoff
- Inline sediment filters add another layer of protection before storage
- Stainless steel components outlast plastic in marine environments
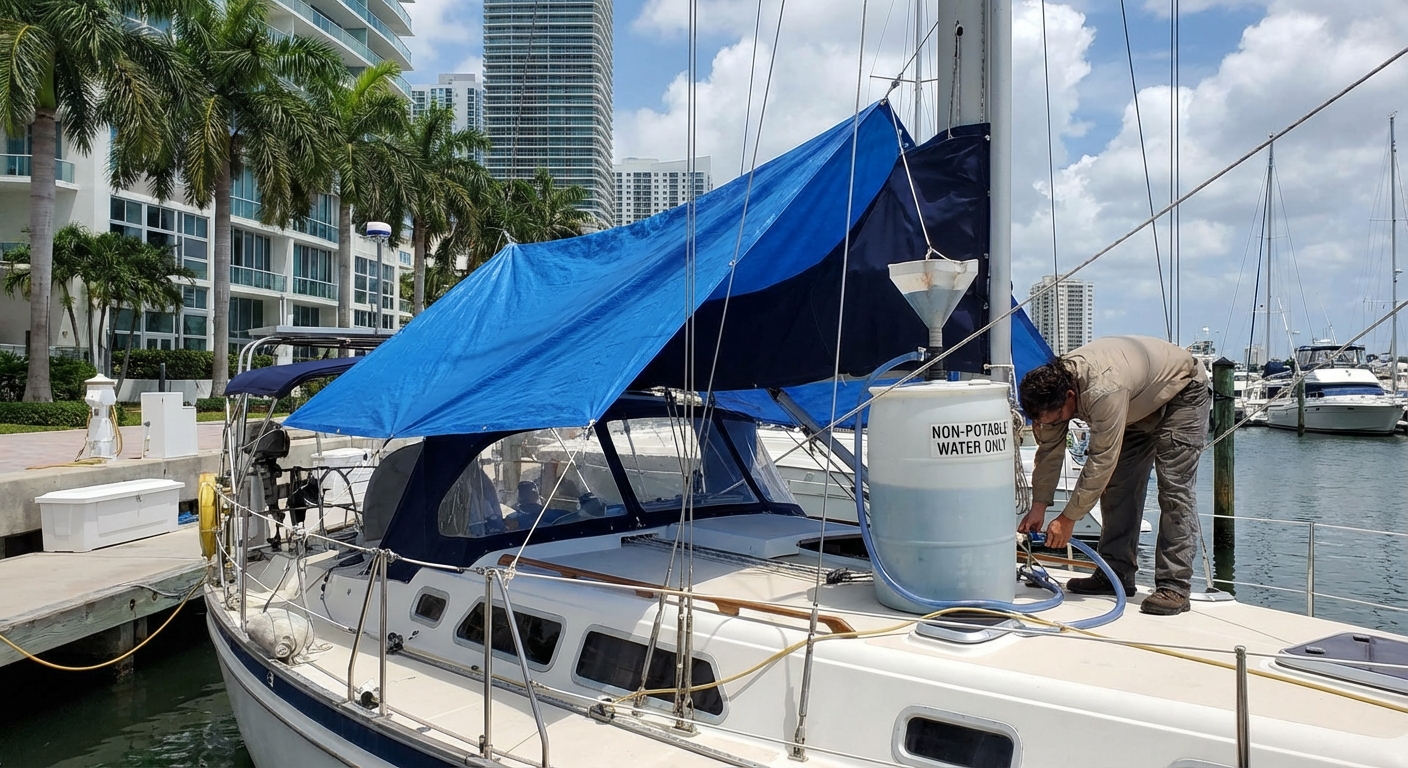
Storage Tanks Need Thought, Not Just Space
Your storage tank is where collected water sits until you use it. Food-grade polyethylene tanks are the standard—they're UV-resistant, non-toxic, and available in sizes from 5 to 50 gallons. Choose a capacity that matches your usage without monopolizing deck space. A 20-gallon tank is a sweet spot for most cruisers, providing enough reserve for several days of non-potable use without becoming a space hog.
Mounting location matters. The tank needs to be accessible for cleaning but out of the way of normal operations. Secure it with straps or brackets rated for marine use—a loose tank in rough seas is a hazard. Install the tank below your collection point so gravity does the work. If that's not possible, you'll need a small pump, which adds complexity and potential failure points. Keep it simple. Let physics handle the heavy lifting.
Overflow and Drainage Prevent Disasters
Heavy rain will fill your tank faster than you expect. Without an overflow outlet, you'll have water spilling onto your deck or backing up into your gutters. Install an overflow hose at the top of your tank, routed overboard or into a secondary container. This prevents overfilling and keeps your system from becoming a liability during downpours.
The overflow hose should be the same diameter as your inlet or larger. A smaller hose creates a bottleneck, defeating the purpose. Secure the hose with clamps and ensure it has a clear path overboard. If you're routing it through a scupper, make sure the scupper can handle the additional flow. Test the overflow during your first heavy rain. If water backs up, you've undersized the outlet or created a kink somewhere in the line.
Plumbing and Fittings Hold It Together
The connections between your gutters, filters, and tank are where most DIY systems fail. Use marine-grade hose and fittings rated for freshwater. PVC works, but flexible hose is easier to route around obstacles and absorbs vibration better. Secure every connection with stainless steel hose clamps—two per joint if you're in rough water regularly.
Avoid sharp bends in your hose runs. Every 90-degree turn reduces flow and creates a spot where debris can accumulate. If you need to change direction, use gradual curves or multiple fittings to maintain a smooth path. Check all connections after installation and again after your first few rain events. Leaks that seem minor on the dock become significant problems offshore.
- Marine-grade hose resists UV and saltwater degradation
- Stainless steel clamps prevent corrosion and slippage
- Gradual bends maintain flow and reduce clogging
- Double-clamping critical joints adds redundancy
- Regular inspections catch small leaks before they escalate
Testing Reveals What Theory Misses
Once everything is installed, wait for rain. No amount of planning replaces real-world testing. Watch the system during the first storm. Does water flow smoothly from the catchment area to the tank? Are there leaks at the joints? Does the overflow activate when the tank fills? Take notes. Every system has quirks that only reveal themselves under load.
If flow is sluggish, check for clogs in the filter or kinks in the hose. If water pools in the gutters, adjust the slope. If the tank fills too slowly, your catchment area might be smaller than you calculated, or your filter is too restrictive. Make adjustments immediately. A system that underperforms in light rain will fail completely in a downpour. Test, tweak, and test again until it works without intervention.
Maintenance Keeps It Running
A rainwater system isn't install-and-forget. The filter needs cleaning after every significant rain event. The catchment surface needs periodic scrubbing to prevent buildup. The tank requires inspection for algae, sediment, or odors. Neglect any of these, and your water quality degrades fast. Set a maintenance schedule and stick to it. Monthly checks are reasonable for most cruisers. More frequent if you're in a dusty or high-pollen environment.
Empty and scrub the tank at least twice a season. Even with filtration, sediment accumulates at the bottom. Use a mild bleach solution or vinegar to disinfect the interior, then rinse thoroughly. Inspect hoses and fittings for wear. Replace any components showing cracks, discoloration, or brittleness. A $5 hose clamp replaced now saves a $500 repair later. Maintenance isn't glamorous, but it's the difference between a system that works and one that becomes a project you avoid.
Usage Discipline Extends Your Supply
Collected rainwater is a finite resource. Use it strategically. Prioritize high-volume, low-sensitivity tasks like deck washing and gear rinsing. Avoid using it for anything that requires potable-grade water—no cooking, drinking, or wound cleaning. Label your tank clearly to prevent accidental misuse, especially if you have guests or crew unfamiliar with your setup.
Monitor your usage rate against your collection rate. If you're draining the tank faster than rain refills it, adjust your consumption or expand your catchment area. Some boaters install a simple sight gauge on the tank to track levels at a glance. Others use a float switch connected to an indicator light. The method doesn't matter—what matters is knowing how much water you have and planning accordingly. Running dry because you didn't check the tank is a self-inflicted problem.
Upgrades and Expansions Come Later
Start with a basic system and add complexity only after you've proven the fundamentals. Once you've run a simple setup for a season, you'll know where the pain points are. Maybe you need more storage. Maybe a second catchment area makes sense. Maybe a UV sterilizer or carbon filter would improve water quality for specific uses. But don't over-engineer from the start. Complexity adds failure points and maintenance burden. Build the simplest system that meets your needs, then iterate based on real experience.
Some boaters integrate their rainwater system with their existing freshwater plumbing, using it to supplement their main tanks for non-potable circuits. This requires backflow prevention and careful labeling, but it can significantly extend your water autonomy. Others add a small pump to pressurize the rainwater tank, making it easier to use for deck washdowns or head flushing. These are worthwhile upgrades, but only after you've mastered the basics. Walk before you run.
The Payoff Compounds Over Time
A well-executed rainwater collection system changes how you think about water on your boat. You stop worrying about topping off tanks at every marina. You stop rationing water for deck cleaning. You stop feeling guilty about rinsing gear after a dive. The system pays for itself in convenience and peace of mind long before it saves you money on dockage or water fees.
The best part? Once it's dialed in, it runs itself. Rain falls, water collects, you use it. No apps, no subscriptions, no waiting for someone else to solve your problem. It's a small piece of self-sufficiency that makes every trip a little smoother. That's the real win—not the gallons saved, but the mental overhead eliminated. Build it right, maintain it consistently, and it becomes one less thing to think about while you're out there doing what you actually came to do.
Ready to Make Your Boat Work Smarter?
When you’re set to upgrade your boat’s systems or need a hand troubleshooting a rainwater setup, we’re here to help you get it right the first time. Let’s make your time on the water easier, cleaner, and more efficient. Call us at 305-290-2708 or Request Boat Repair or Service and we’ll help you get your boat dialed in for the season.


.png)